


Maximizing your computer’s performance is a worthwhile endeavor. If you’ve had your PC for a while, you probably noticed its performance declining. This decline can look like longer boot-times, slow response times in your day-to-day tasks and apps stuttering and sometimes failing. If the decline is slight you may be able to ignore it, but it may be severe and rendering your computer almost unusable. This simple guide will help you upgrade your laptop by showing you how to troubleshoot and provide solutions to many basic problems. It will provide you with actionable strategies that include but are not limited to; maintenance routines, software and hardware upgrades and monitoring habits to keep your PC running smoothly.
There are many components in your computer and any one or combination of them may be handicapping its performance. The good news is that there are easy fixes for many of these problems. The common hardware hindrances are the storage device, the memory and the thermal system. Issues could also be caused by software problems like unnecessary startup applications, too many concurrent background processes and bloatware. Whether you’re a casual user seeking smoother web browsing or a power user juggling multiple high-performance applications, a snappy system is everyone’s goal.
Understanding Windows Laptop Performance
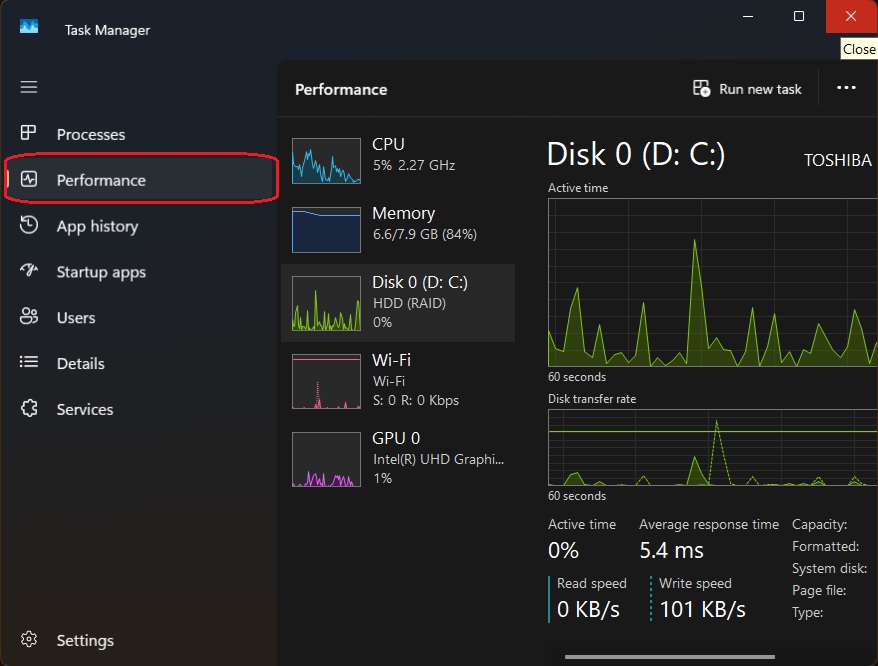
You must first understand your problem to fix it. Therefore, to upgrade your laptop, you must fugure out where it’s problems lie. So, to start I want you to open windows’ built-in task manager. You’ll be able to see real-time graphs of CPU utilization, memory usage, network throughput and even GPU load among others. Simply press Ctrl+Shift+Esc or right click on your taskbar to open. Then navigate to the Performance tab and you find a wealth of information that will help you accurately track your computer’s performance.
You can also download third party applications like HWiNFO which give a more comprehensive breakdown of your performance metrics. Another useful feature is they give you basic information on your device. They can be used as a quick and easy way to check component specifications in addition to their performance stats. This is invaluable if you need to replace any components and don’t know where to start. A simple AI prompt could also provide you with basic information about your device’s components. Simply enter the serial number located at the bottom of the laptop. Remember to double check any answers you get as they may be incorrect. This is due to the fact that manufacturers sell different configurations of the same computers in different regions. Or if you purchased a refurbished computer, the technician may have had to swap out some damaged component.
Common Bottlenecks
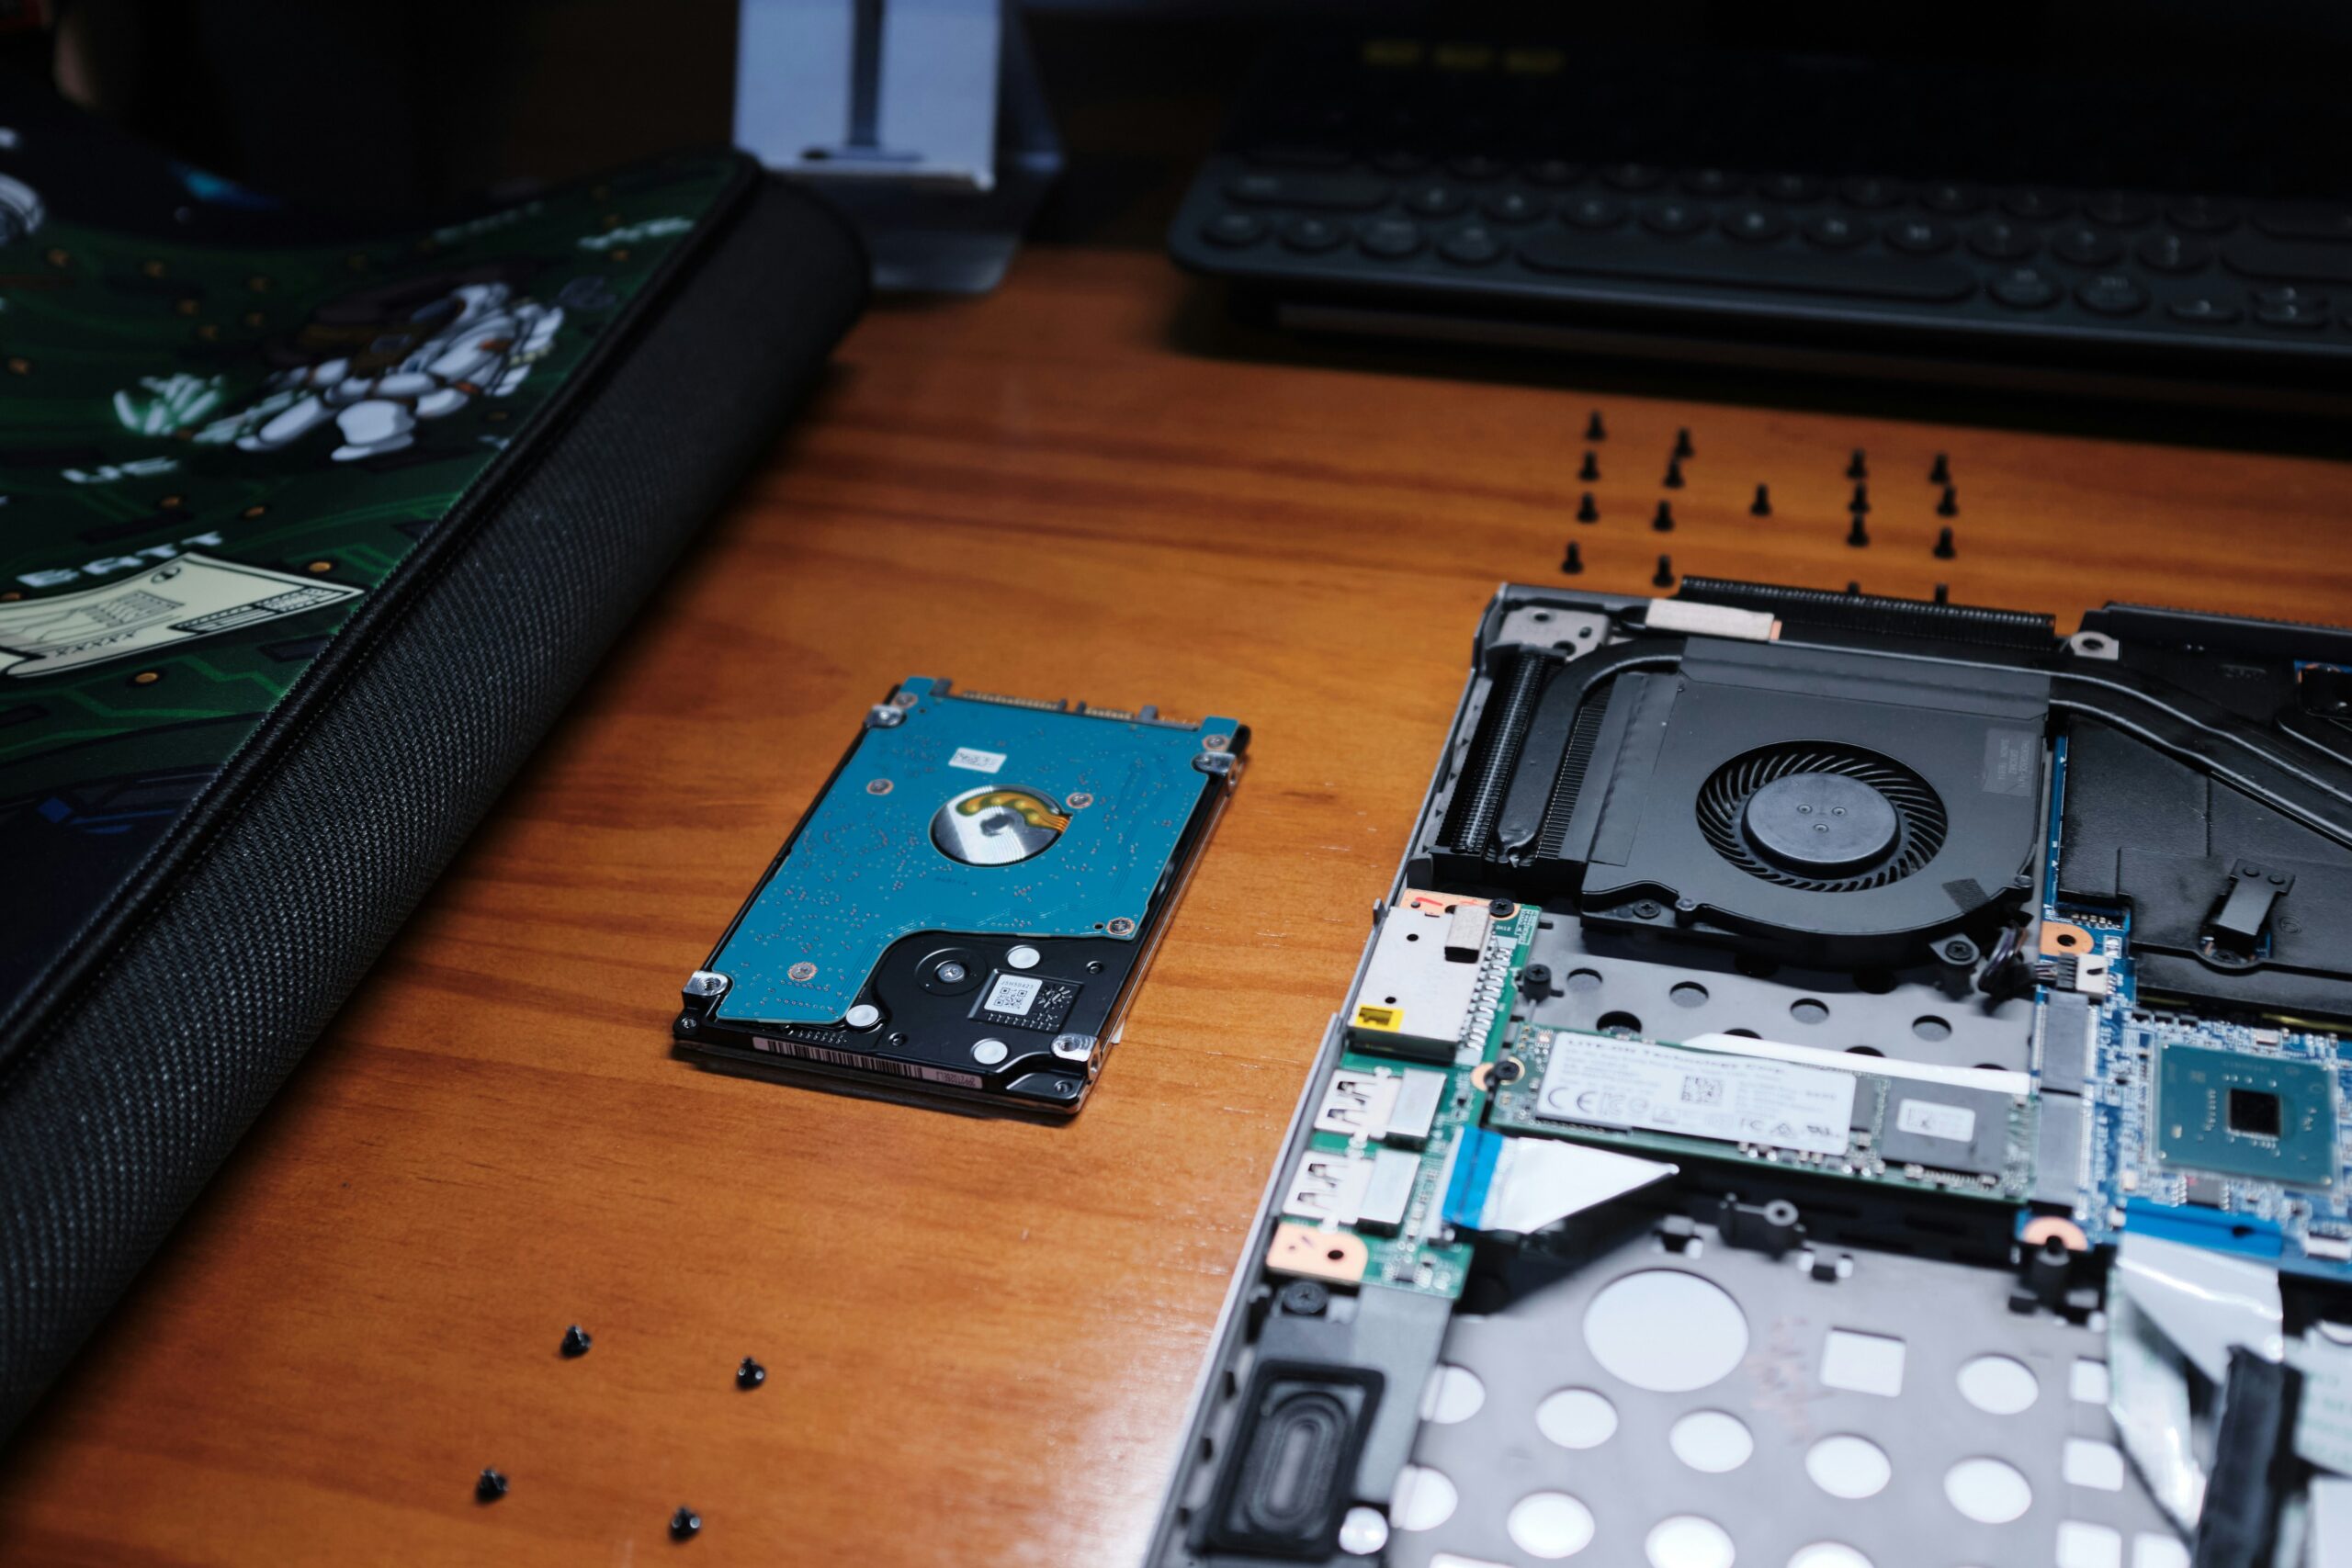
As mentioned earlier, the most common hardware-related reasons for performance problems are the memory, storage and thermals. Storage refers to the disk in your computer that stores your data. Your operating system, applications and personal files all reside in the storage device. Hence a slow storage device will affect every aspect of your usage from how long your computer takes to boot to how much time it needs to open applications or access files. A mechanical hard drive will struggle to match speed of a flash memory device, also known as an SSD. We see SSDs routinely hit speeds anywhere from 4 to 50 times higher than HDDs. They also contain no moving parts and are therefore less prone to failure.
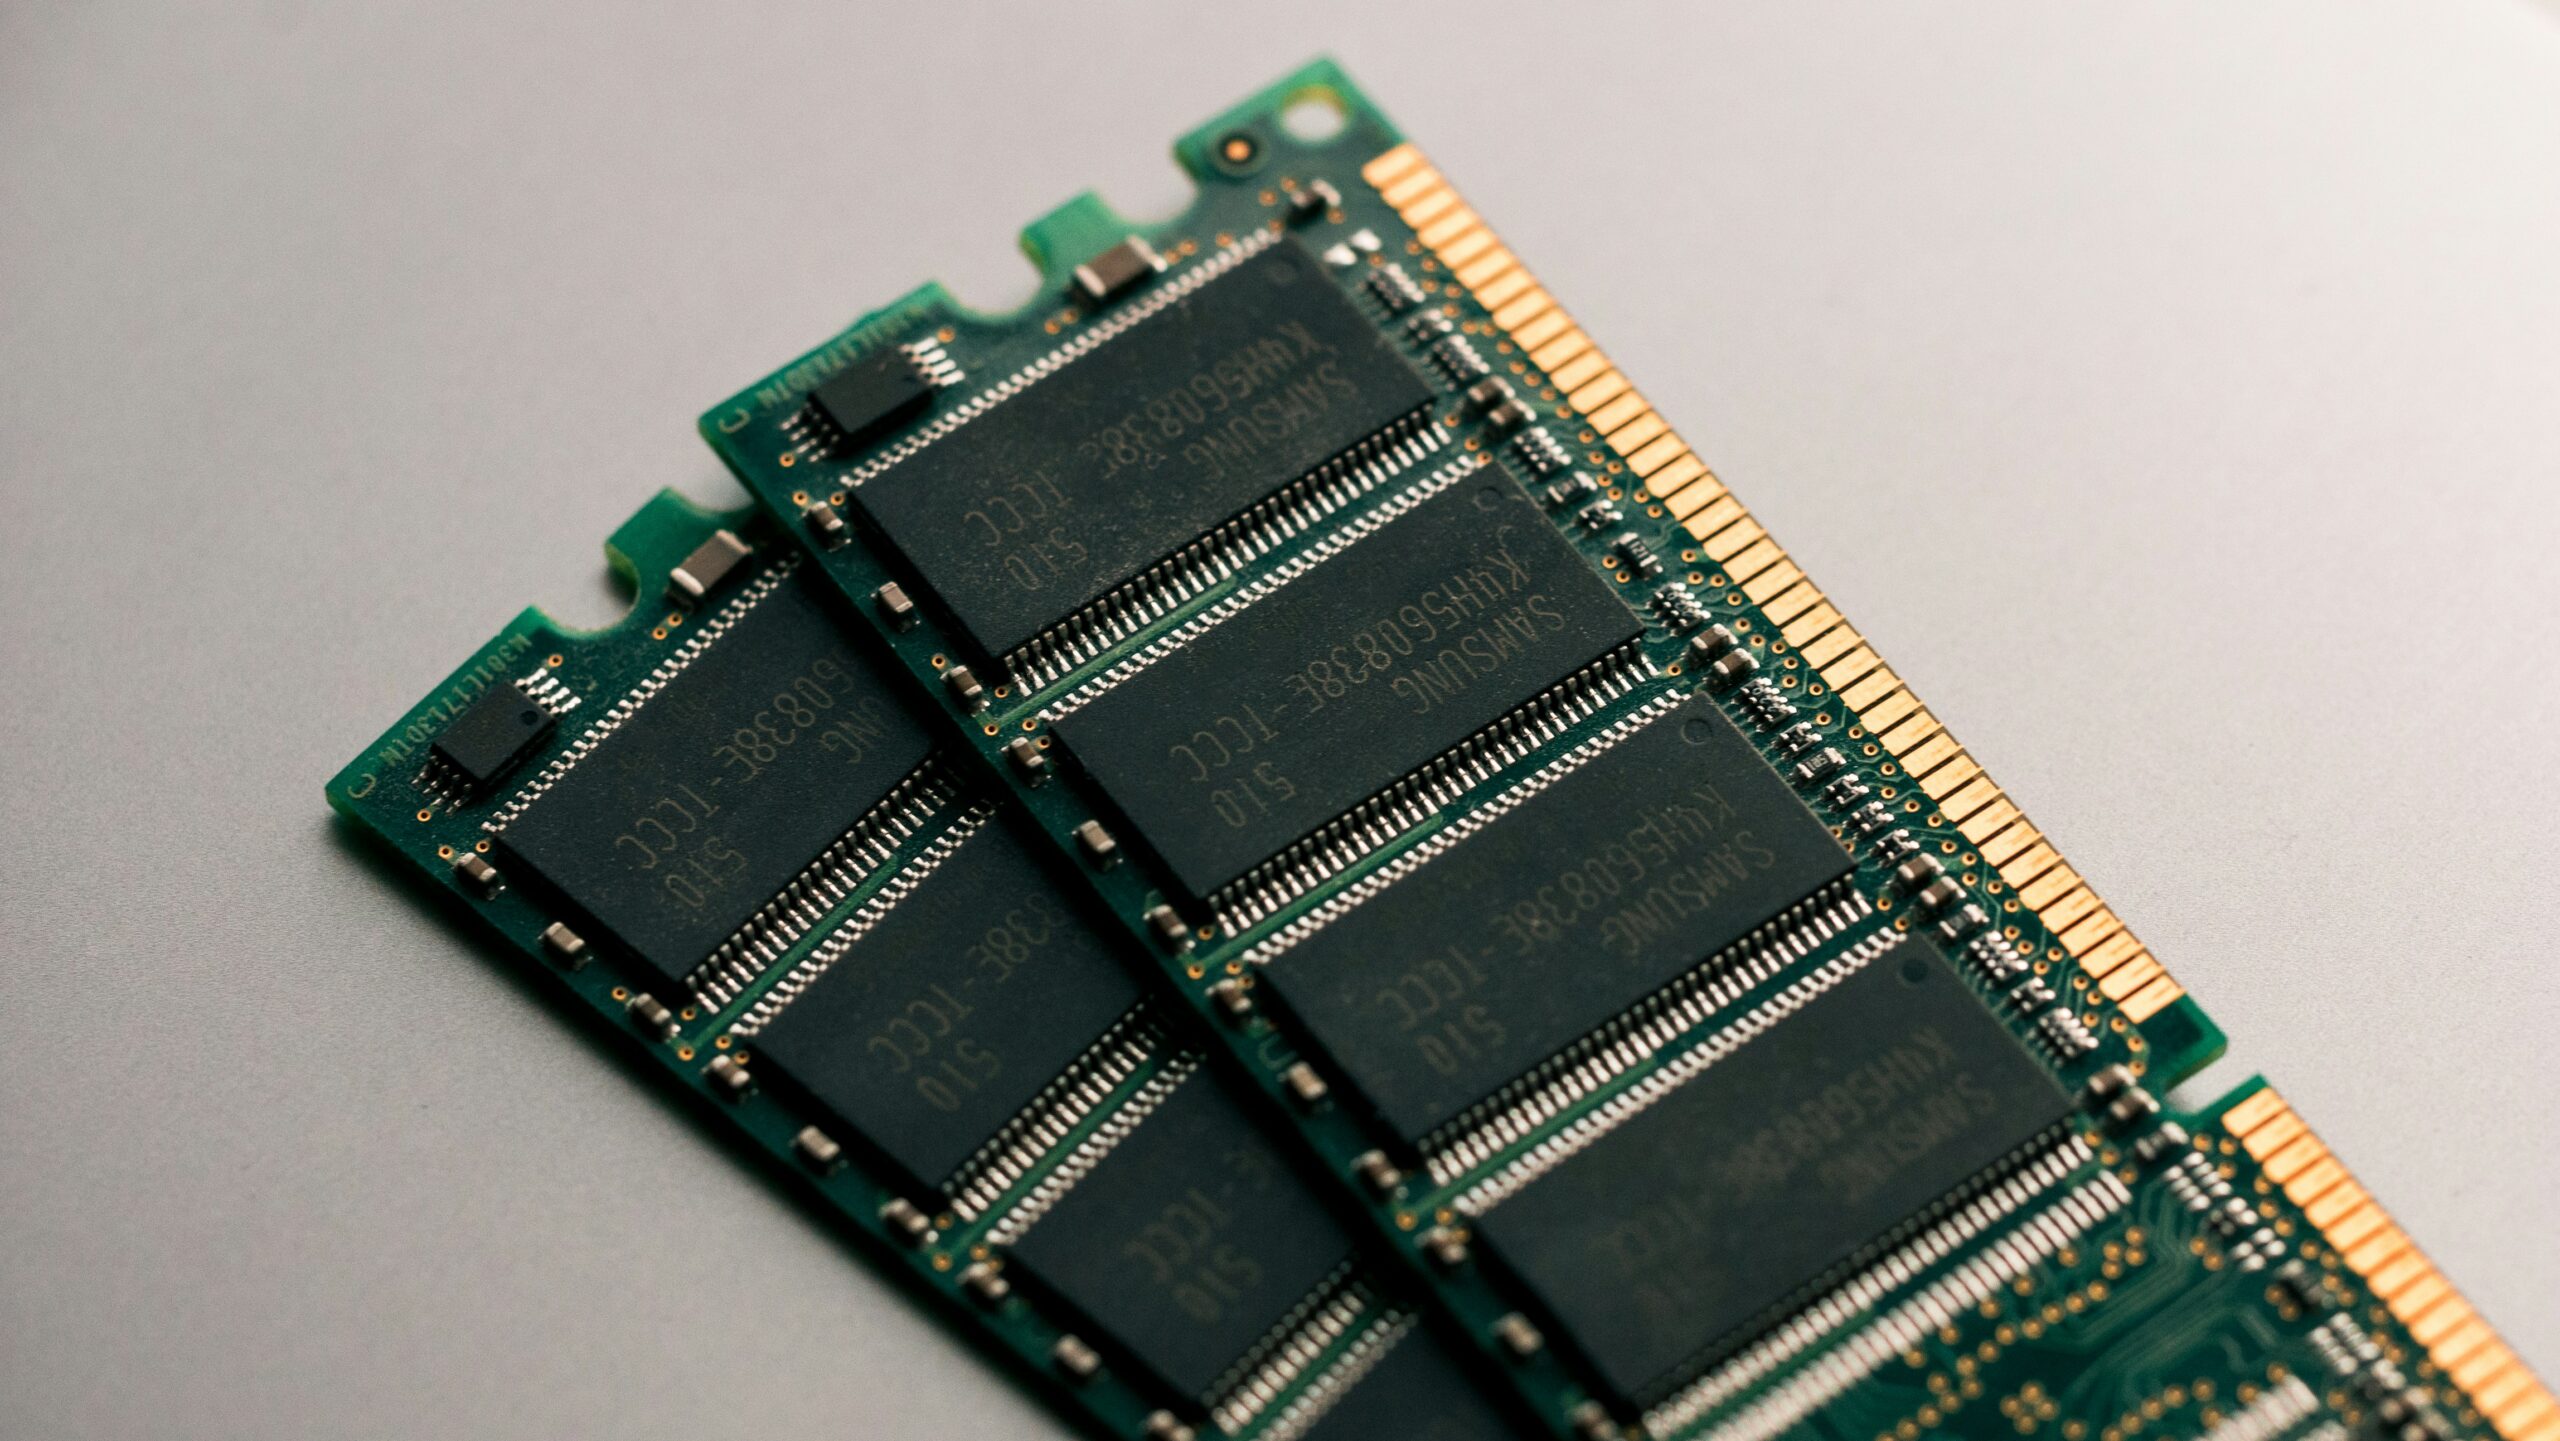
RAM refers to fast access temporary memory that is used for active data and open programs. Having larger RAM capacity means your computer will have an easier time running multiple applications simultaneously. This means more programs will be stored on the ultrafast RAM module and therefore be available to you at a moment’s notice. On the flip side, smaller capacity means it will only be able to keep fewer programs stored and you will experience longer wait times when switching between applications.
Your thermal system contains all the components designed to keep your computer cool as too high temperatures may damage certain components. It relies on conduction and convection to dissipate heat generated by the components. A thermal paste or pad is applied directly to the component to absorb heat from it and transfer it to the heat sink (conduction). They also have a system of fans to control airflow and radiators to expel hot air from the insides (convection). When the thermal system can’t keep temperatures at manageable levels, it compensates by throttling speeds of the components like the processor, memory or storage. The result is a much slower device that is also uncomfortable to use due to its high temperatures.
Finally, lack of software optimization will slow your computer down considerably. Running your hardware on outdated drivers can cause your computer to run slowly. Too many apps auto-starting and running in the background when you boot up will have the same effect. Software issues are usually the easiest to fix so we’ll tackle them first.
Regular Software Maintenance
A. Keeping Your Operating System Updated
Windows regularly releases two main types of updates: Feature Updates that bring new tools and improvements, and Quality Updates that fix security issues and bugs. These updates usually come about once a month. You can set your computer to download these updates automatically. To avoid interruptions, you can set your “Active Hours” in Settings → Update & Security so updates happen when you’re not using your computer. If an update causes problems, you can pause updates temporarily or roll back to the previous version through Settings → Recovery.
B. Cleaning Up Your Disk and Optimizing Performance
Windows has a handy tool called Disk Cleanup (just type it in the Start menu) that helps you delete temporary files and leftover data from upgrades to free up space. If you have a traditional hard drive (HDD), running the Defragment and Optimize Drives tool weekly helps keep things running smoothly. But if you have a solid-state drive (SSD), Windows automatically takes care of it behind the scenes, so don’t manually defragment an SSD as it can wear it out faster.
C. Updating Drivers and Firmware
Manufacturers often provide their own apps like Dell Command Update or Lenovo Vantage to help keep your drivers and firmware up to date automatically. You can also manage drivers manually through Device Manager if an update causes trouble. BIOS or UEFI updates can improve hardware compatibility and system stability, but always back up your current settings and read the instructions carefully before updating.
D. Protecting Against Malware and Security Threats
Make sure Microsoft Defender’s real-time protection is always on, and schedule quick scans during times you’re not using your PC. For a more thorough check, tools like Malwarebytes can scan your system for hidden threats like rootkits and potentially unwanted programs, keeping your computer safe and secure.
Power Profiles & Startup Optimization
Optimizing your Windows power settings and managing startup processes are simple yet effective ways to boost your PC’s performance. Here’s a straightforward guide to help you get the most out of your machine without getting too technical.
Windows Power Plans
Windows offers different power plans designed to balance performance and energy consumption:
- Balanced: This is the default plan. It adjusts your CPU speed dynamically to save energy when full power isn’t needed.
- High Performance: Keeps your CPU running at higher speeds consistently, which can improve responsiveness and speed during demanding tasks but uses more battery and power.
To switch between power plans:
- Open Control Panel and go to Power Options.
- Select the plan that suits your needs. Switch to High Performance when you want maximum speed, like during gaming or video editing.
Startup App Management
Many programs launch automatically when you start your PC, which can slow boot times and overall performance. To manage startup apps:
- Press Ctrl + Shift + Esc to open Task Manager.
- Click the Startup tab.
- Review the list and look at the Startup impact column.
- Right-click and Disable any non-essential apps with high impact, such as messaging apps or cloud storage clients you don’t need running all the time.
Reducing startup apps helps your PC boot faster and frees up resources for other tasks.
Service Tweaks with Selective Startup
You can also trim down background services that run automatically:
- Press Windows key + R, type msconfig, and press Enter.
- In the System Configuration window, go to the Services tab.
- Check Hide all Microsoft services to avoid disabling critical system services.
- Uncheck services you recognize as unnecessary (like third-party update services or software you rarely use).
- Click Apply and restart your PC.
This selective startup reduces background load, making your system more responsive day-to-day.
Lightweight Alternatives for Sync Clients
Cloud sync apps like OneDrive or Dropbox constantly run in the background, syncing files and consuming resources. To reduce their impact:
- Consider turning off automatic syncing and manually syncing files when needed.
- Alternatively, schedule syncs during idle times, such as overnight.
This approach keeps your system free from constant resource drains while still backing up your important files.
Storage Upgrades & Optimization
Upgrading from an HDD to an SSD
Switching your laptop’s old hard disk drive (HDD) to a solid-state drive (SSD) is one of the best upgrades you can make to dramatically speed up your computer. You’ll notice much faster boot times-often under 10 seconds-and apps will open almost instantly. Even budget-friendly SATA SSDs offer a big boost over traditional HDDs, while faster NVMe or PCIe Gen4 SSDs can push data speeds to over 3,500 MB/s for lightning-fast performance.
How to Upgrade Your Laptop and Keep Your Data
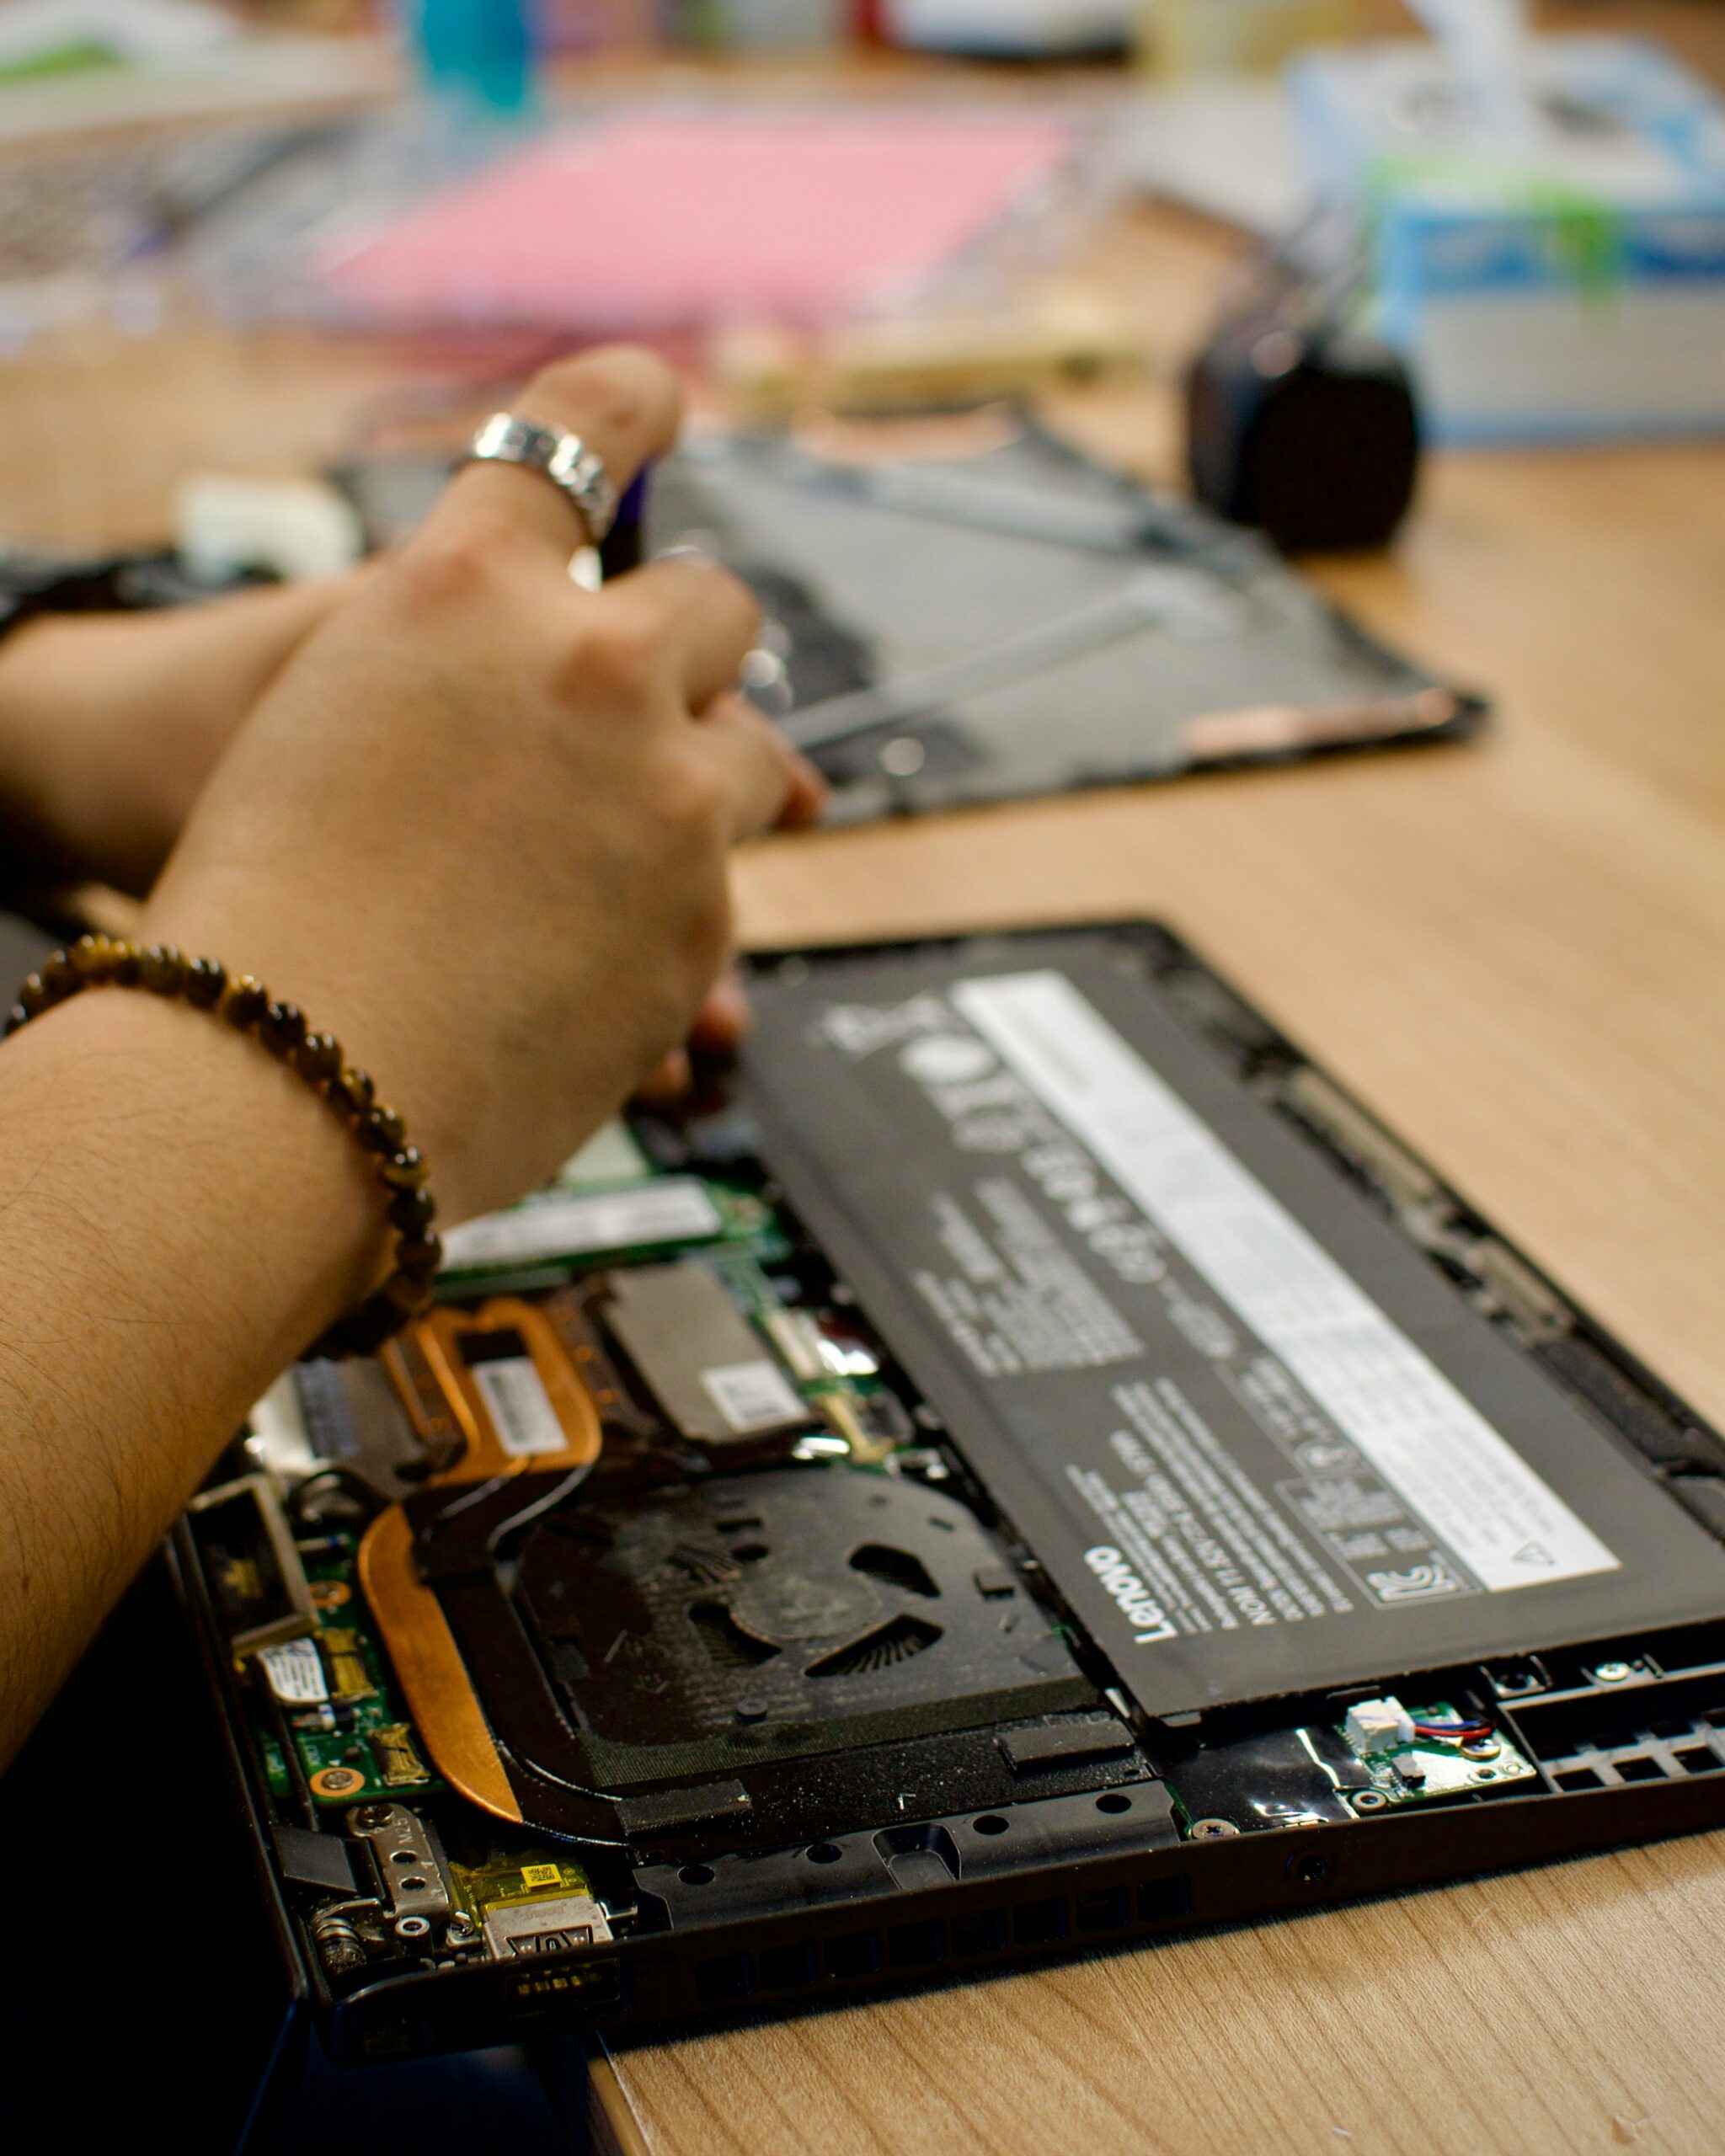
- Prepare Your Tools and Workspace
Make sure your laptop is powered off and unplugged. If possible, remove the battery to avoid any power issues during the upgrade. Have a precision screwdriver ready and consult your laptop’s manual to locate the hard drive bay or access panel. You can find the service manual of your laptop by checking the manufacturer’s website. Alternatively, a youtube search of your laptop’s model number and the issue you’re trying to fix will likely turn up a step by step video on how to do just that. - Remove the Old Hard Drive
Open the access panel carefully, unscrew any brackets holding the drive, and disconnect the cables. Take note of how the drive is connected and positioned because you’ll install the SSD in the same way. - Clone Your Existing Drive (Optional but Recommended)
To avoid reinstalling Windows and all your programs, you can clone your current HDD to the new SSD. This copies everything exactly, including your operating system, settings, and files. You’ll need a SATA-to-USB adapter to connect the SSD externally and cloning software like Macrium Reflect, MiniTool Partition Wizard, or iSumsoft Cloner.
The cloning process usually involves:
- Connecting the SSD to your laptop via the adapter
- Initializing and formatting the SSD if it’s new
- Running the cloning software to copy your system drive to the SSD
- Waiting for the process to complete before swapping drives
- Install the SSD
After cloning, physically replace the old HDD with the SSD. Insert it into the same slot, secure it properly, and close the access panel. - Boot Up and Verify
Power on your laptop and enter BIOS/UEFI to confirm the SSD is recognized. Your system should boot normally, but much faster. If everything looks good, you’re done.
Tips for a Smooth Upgrade
- Back up important data before starting.
- Keep track of screws and parts during disassembly-taking photos or videos helps.
- If your laptop supports multiple drives, consider keeping the old HDD as extra storage.
- Avoid manually defragmenting SSDs, as they manage themselves internally.
It is importent to upgrade your laptop with an SSD, as it breathes new life into older laptops, making them feel snappy and responsive again without the cost of a brand-new machine. With a bit of patience and the right tools, it’s a manageable DIY project that pays off in everyday speed and reliability.
Memory (RAM) Upgrades & Management
Before deciding to upgrade your laptop by increasing the RAM, it’s essential to check how much memory your Windows machine is currently using. This helps you determine whether your system actually needs more RAM or if other factors might be slowing it down.
Assessing Your RAM Usage
To see if your computer needs a RAM upgrade, start by checking your current memory usage in Task Manager:
- Open Task Manager
- Go to the Performance Tab
- Select Memory: On the left sidebar, click “Memory.” Here, you’ll see a graph and detailed stats showing how much RAM is installed, how much is currently in use, and how much is available.
- Interpret the Data:
- If your RAM usage is consistently near or at 100% during typical tasks, your system is likely struggling and could benefit from an upgrade.
- If there’s plenty of available memory but your system feels slow, the issue might lie elsewhere.
You can also check the “Processes” tab and click the “Memory” column to see which programs are using the most RAM. This helps identify if a specific app is hogging resources and whether closing it improves performance.
Assessing Your Needs
Once you know your current RAM usage, match it to your workload:
- 8 GB: Good for everyday web browsing and office apps.
- 16 GB: Better for heavier multitasking and light photo editing.
- 32 GB or more: Recommended for virtualization, large-scale video editing, or complex 3D work.
Installing Additional RAM Modules
If you decide to upgrade:
- Check Compatibility: Use tools like Crucial’s System Scanner or your laptop’s OEM spec sheet to confirm maximum supported RAM and compatible speeds.
- Install Matched Pairs: Installing RAM in matched pairs enables dual-channel mode, which can boost memory bandwidth by up to 15% in bandwidth-sensitive tasks.
- Installation: Power down your system, open the RAM compartment, and carefully insert the new modules into the empty slots, ensuring they click into place securely.
Also important to note is ensuring you purchase RAM modules that are as quick or faster than the one you already have installed. This is due to the fact that in a dual channel RAM setup with two sticks of different speeds, the faster module always downclocks to match the speed of the slower one to ensure smooth operation.
Managing Virtual Memory (Pagefile)
Windows manages virtual memory automatically, but you can optimize it by:
- Moving the Pagefile: Relocate it to your fastest drive (preferably an SSD) for better paging performance.
- Manual Settings: If you prefer manual control, set the initial and maximum pagefile size to 1.5 times your physical RAM.
You can have your AI assistant walk you through how to do this.
When you monitor your RAM usage and upgrade when necessary, you ensure your Windows machine runs smoothly and efficiently.
Thermal Management & Cooling
Keeping your Windows machine cool is crucial for maintaining peak performance and avoiding frustrating slowdowns caused by thermal throttling. Here’s what you need to know about managing heat effectively.
Thermal Throttling Basics
When your CPU or GPU temperatures rise too high—typically around 90 °C for many laptop chips—Windows automatically reduces their clock speeds to prevent hardware damage. This process, called thermal throttling, protects your components but also causes noticeable drops in performance, such as stuttering or lag during demanding tasks. Thermal throttling is a safety measure that kicks in when your system’s cooling can’t keep up, often due to poor airflow, dust buildup, or intense workloads. The following tips are more about maintenance and optimization which are cheap ways to upgrade your laptop experience.
Cleaning & Reapplying Thermal Paste
Over time, the thermal paste that helps transfer heat from your CPU or GPU to their heat sinks can dry out or degrade, reducing cooling efficiency. To maintain optimal heat transfer:
- Open your laptop carefully (ensure it’s powered off and unplugged).
- Remove the old thermal paste using isopropyl alcohol and a lint-free cloth.
- Apply a fresh, pea-sized dab of high-quality modern thermal paste evenly on the chip.
- Reassemble your laptop.
Doing this every one to two years can significantly improve heat dissipation and reduce the risk of thermal throttling.
Cooling Pads & Stands
External cooling solutions can help keep your laptop’s temperatures in check:
- Cooling Pads: These devices have built-in fans that blow cool air into your laptop’s intake vents, lowering chassis temperatures by several degrees.
- Angled Stands: Passive stands elevate your laptop to improve airflow underneath, especially helpful for models with bottom intake vents.
Both options enhance ventilation and reduce heat buildup, helping prevent thermal throttling during extended or intensive use.
Backup, Recovery & Rollback Strategies
Keeping your Windows machine running smoothly isn’t just about upgrades—it’s also about protecting your data and having a plan for when things go wrong. Here’s how to safeguard your system and recover quickly if needed.
System Image Backups
Creating a full system image is like taking a snapshot of your entire hard drive, including your operating system, programs, and files. If a Windows update or software installation causes problems, you can restore your PC to this exact state in minutes.
- Use Windows Backup or free tools like Macrium Reflect to create these backups.
- Store the image on an external drive or network location for safety.
File-level Sync
For ongoing protection of your personal documents and photos, use cloud sync services like OneDrive or Dropbox. These services continuously back up your files incrementally, meaning only changes are saved, which keeps your data safe without using excessive bandwidth or storage.
Recovery Options
If your PC starts misbehaving and simple fixes don’t help, Windows offers built-in recovery tools:
- Reset this PC: Choose to keep your personal files or remove everything and reinstall Windows to start fresh.
- Clean Install: As a last resort, a clean installation wipes your drive and installs a fresh copy of Windows, which can resolve stubborn issues and restore peak performance.
Maintenance Schedule & Checklists
Regular maintenance keeps your system healthy and extends the life of your hardware. Here’s a simple schedule to follow:
| Frequency | Tasks |
| Weekly | Empty Recycle Bin, run a quick antivirus scan, perform Disk Cleanup to free space. |
| Monthly | Check for driver and firmware updates, run a full malware scan, defragment HDDs if applicable. |
| Quarterly | Clean your laptop or PC internals externally, review BIOS updates. |
| Annually | Reapply thermal paste to improve cooling, reassess if hardware upgrades are needed. |
Conclusion
An upgrade of your laptop storage to an SSD and boosting it’s RAM are two of the most impactful ways to enhance performance. But true long-term speed and reliability come from a holistic approach: managing power settings, optimizing startup processes, maintaining proper cooling, and having solid backup and recovery plans in place.
By following the tips and schedules outlined here, you’ll keep your system running smoothly, avoid unexpected slowdowns, and be ready to bounce back quickly if issues arise. With a little regular care and smart upgrades, your Windows PC can stay fast and responsive for years to come. Read this next to know how to keep yourself secure on the web on your upgraded device.